Sunday 18 October 2015

Craft Fairs - no rhyme nor reason to what sells

I am flopped on the sofa after a day touting my wares at the Highland Wool & Textile Fair at Eden Court Theatre in Inverness.  This was a lovely event in a great location, but as the weather was splendid for the time of year, I think a lot of people decided that being out of doors was a better plan.  It was really quiet compared with previous years.  However, those who came were buying.

I just wish I could work out what makes people buy particular things.  Is it how they are displayed?  What colours things are?  How much space they have to browse?  Is it better to have things individually priced or to have big labels saying e.g. "Harris Tweed Scarves - £40".  Does it make a difference where I am on the stall - behind the table?  off to the side?  sitting or standing?  I wish I knew!

Today was strange........... lots of sales, but all completely different things.  More often at craft fairs there will be a particular thing that I sell lots of and other things that are not looked at but today I sold a scarf, a hooded scarf, a bag,  two different styles of hats.......... etc. etc.     I know I tried to cram too much onto my stall (....... I have never mastered the art of minimalism!) but still people looked at everything.  Or rather, some people looked at one thing, others looked at something else and it was as though they only saw that one thing.

What did get a lot of attention was the new jackets I had made this week.  One was a petite size swing jacket (pictured on display right), the other was an oversized dufflecoat style (modelled by me below).  They are definitely going to be included as part of our range of products although they will generally only be made to measure.

The fair ran from 10am till 4pm.  At 3.30 it was dead and some stallholders started to pack up but then there was a sudden influx of people coming in to see an early show and lots of them did a quick whiz around the fair first.  I got a couple of last minute sales, so that rule of "don't start packing up until the show is closed" is worth stitcking to.

When the last customer had gone I started packing and got it all done and car loaded within the hour.  As I had to go past the house to get to my studio I stopped off to have a quick bite to eat - having gone hungry all day.  By the time I headed out to the studio to empty the car the sun was setting.  What a tremendous view over the Beauly Firth!   My usual drive at that time of day is in the other direction coming home from the studio so this was something of a treat.
I have booked for three more craft fairs between now and Christmas.  It will be a hectic run because they are on consecutive weekends, so no time off for 3 weeks on the trot. 
  • 20th to 22nd November 2015 - Eden Court, Inverness.
  • 28th to 29th November 2015 - Eden Court, Inverness.
  • 4th to 6th December 2015 - Eden Court, Inverness.
If you live in the Highlands, why not make a point of coming to one of them - for details, see either the Exclusively Highlands website or the Anna Macneil website.  And when you visit - give me your honest opinion about our stall and tell me what catches your eye, even if you are not going to buy it.

And of course, if you can't make it either to our workshop or to one of the craft fairs, our on-line shop is always available.  This coming week my husband has promised to work on a new website for me - not holding my breath for a quick result, but I hope to make the website easier to use and more informative.  Watch this space.........!

Tuesday 22 September 2015

Weaving more Harris Tweed - and making a big mistake with the warp

I am just back from another visit to the Isle of Lewis.  I go there for a week or so most months to look after my elderly mother.  A lot of my time is spent cooking and filling the freezer with home cooked meals for her to eat between my visits, but while she is resting (most of the time!) I go out to the loom shed and weave Harris Tweed.

Cool Colours for Summer

I finished off the tweed that was on the loom - it had about 20 metres still to be woven when I left after my last visit in August.  This particular warp was all pale colours, mostly cream, grey and oatmeal, but with single strands of pale pink, pale blue and pale green repeating every 24 ends.   Perhaps not the blue, but all the other colours were like icecream colours, perfect for weaving on hot summer days - mint, chocolate, strawberry, pistachio.  I wove most of this with a cream weft,
but I also wove some with pale blue, some with pale pink and some with pale green.  It was all very restful on the eye and a pleasure to work with.

It may look a rather random pattern but it is actually a semi-regular herringbone - an 8/8 coupled with 4/4.  It is easier to see the pattern when there is a strong contrast in colour, but I was not aiming for the pattern to be obvious, more one that draws one in to look more closely. Of course there may be the odd threading mistake - but it is not really the pattern that counts here - it is helping to break up the stripes of the warp to create an interesting texture.


I took the tweed to Carloway Mill on Monday morning where it will be washed, finished and stamped with the Orb certification mark.  I will probably get it delivered to our studio in about 3 weeks time and then it will get made up into our cosy wraps, scarves and hooded capes.

Hot Hues for Winter

I also made up a new warp ready for my next visit.  The loom shed is a very cold place in winter - a metal garage door that doesn't keep out the wind, no heating or insulation and a hard concrete floor - so I decided that I could at least have warm colours to look at while I weave.  I chose several shades of reds and wines and added in the odd cone of pink and orange.   It is going to be stunning when it is woven, even though I will probably tone it down a bit and most of it will be woven with a very dark plum colour of weft.

The only problem was...... I made a huge mistake while winding the warp as on one round (out of 29) I must have missed one peg, so those 24 ends were 8 metres short.  I only discovered this as I was chaining off the warp prior to transferring it to the loom.  I had to lengthen each of those ends but inevitably, when tying in the extra lengths, some of the yarn has got crossed over and tangled.  You can see in this photograph what the problem is - I had to put the warp bundle back onto a higher post and twist it round to keep in place while I tied in the extra lengths.


This stupid error meant that I knew there were going to be tangles as I beamed the warp so I declined the offer of help with beaming (better not to have an audience when one is getting cross!!).  It means the beaming process is very slow.  I worked out a way of keeping a good tension on the warp as I wind, it is effective but slow.  I have managed to get past the problem area - I have probably wound about
20 metres onto the beam, another 40 to go but I had a ferry to catch so just had to leave it at that stage.  What I have been doing is attaching one of the cloth weights using a bit of thin rope and a larkshead knot, winding about 80cm then sliding the knot down the warp before repeating the process... and repeating ....... and repeating!   I have left it with the weight in place as I don't want the tension slacked off before I go back to finish the job next month.

This warp is 60 metres, so it will probably be December before I finish the weaving, it may even stretch into January depending on how much time I can spare to visit the island.  Watch this space!

Saturday 13 June 2015

The final felt banner - with Muir of Ord Art Group

This post is about the making of the fifth of five felt banners being made through Groam House Museum.  All five are taking inspiration from the work of George Bain widely considered to be the father of modern Celtic Art.  The museum houses a large collection of Bain's work along with a collection of Pictish stones.

You can read about the first four wallhangings by clicking on these links.
1 ~ Groam House Museum Volnteers Group, made in Fortrose
2 ~ Resolis Friendship Group, made in Resolis Memorial Hall
3 ~ Culbokie Friendship Group, made in the Culbokie Church Centre
4 ~ Avoch Friendship Club, made in the Parish Church Hall

This banner is being made by volunteers from the Muir of Ord Art Group in their premises in the old school building in the village square.  Other people from the village came to help as well, some staying all day, others just dropping in for a short time.  The library is in the same building so people saw us at work when they came to change their books.

Wednesday 10th June 2015


Today was the warmest day of the year so far but we didn't see much of it as we were hard at work making felt for the coloured sections of our banner.   I took far more photographs than there is space for here, but you can see more of them on a web album - click here.

The design was to follow the same format as the previous wallhangings - Celtic knotwork panels around the edges with some text in the middle section along with others things of particular significance to the place of making.  In this case we drew on some of the history of the village which was originally called Tarradale.  Muir of Ord was an important place for trading of the traditional black cattle favoured by Highland crofters and drovers.  (Highland cattle were black before the Victorians bred them to obtain the lighter browns that we recognise today).  There is a large distillery on the edge of the village and in earlier times the area had a lot of illicit whisky stills so we decided to include these in the design.  The village had a large army base during the war and the war memorial stands just outside the building where we are working so we decided we would include some red poppies.

To create these various components we had to make several pieces of coloured half-felt, i.e. a fabric which has been felted just enough to hold the fibres together, but not so much that it couldn't be felted into the background.

First task was to choose our colours. 
Each person chose two contrasting colours - some opted for tone on tone, others for complimentary colours. The darker colour was laid down first and then the second colour added at right angles.

Some fancy fibres - angelina, silk, mohair - were added to give a bit of interest to each piece and then it was time to wet down with warm soapy water.   After a bit of rubbing through sheets of bubblewrap the fibres had felted together enough that we could squeeze the water out and cut it up into the shapes we needed for our design.

The designs were traced onto a thin non-woven fabric that is normally used as a backing for machine embroidery, but is good for this purpose because it can be drawn on with marker pens and doesn't disintegrate if it gets wet.   Once traced, the patterns were pressed down onto our damp felt pieces and we cut the pieces out with scissors.

By the end of the day we had all the various components ready - except for our Highland cows.  We had the felt, but not the design.  However, one person volunteered to do a drawing that night ready for us to cut out the felt the next morning.

Thursday, 11th June


The task this morning was to create the background for our panel.  I had spread a large sheet of bubblewrap on the table and on top of this a piece of ice wool.  This is a loose, open mesh knitted fabric that is a combination of an acrylic yarn and a lot of fluffy wool fibres.  It is manufactured as an insulator for posh jackets, but it works very well as a base on which to felt ensuring that there will be no holes or thin patches in our wallhanging.

Then we set to work covering the area with two layers of white merino wool fibres, checking that there were no gaps or thin areas.  Once satisfied with this we added some touches of colour, sparkle and textural interest in the form of silk, synthetic and metallic fibres along with strands of mohair yarn and some coarser varieties of wool.

I brought through two buckets of warm soapy water which was duly poured onto our bed of fibres.  Another sheet of bubblewrap on top and we were ready to rub.  We did this just for a few mintues to ensure all the fibres were wet through and flattened.

Time to start the fun bit - getting our design in place.  I laid the paper plan out on the floor and all our cut-outs from the day before were arranged on that - including the Highland cattle, poppies and clarsach which had been cut out earlier.  We did a bit of put and take until we were all happy with the design and then transferred them piece by piece onto our background felt.   The two sections of vinescroll designs had to be intertwined with the zoomorphic creatures that "inhabit" them.  The poppies and the whisky stills had to be arranged, with some partially hidden under the knotwork panels.   When were were satisfied all was in place we damped down the additions, covered it all with the bubblewrap and started rubbing.

A few minutes later we peeled off the bubblewrap and spent some time snipping through the top layer in each knotwork panel  to create the effect of "overs & unders" which is typical of Celtic knotwork, then replaced the bubblewrap and started the serious rubbing........ and rubbing....... and rubbing.

We were blessed with the help of four gentlemen with large hands - what a difference this makes to the rubbing process - they had a much better coverage than mine!

After an hour or so of rubbing we were able to turn the felt over and repeat the process on the back.  Within a short while we could see an impression of our design coming through to the reverse - a sure sign the felting was going well.  By 3 o'clock we were happy that everything was well and truly felted and we rolled it up and squeezed out the water.  A lot landed on the floor, but we had a bucket and mop handy along with lots of towels.

All that remained was to tack a tracing of the space we had left for the text so I can cut stencils for all the words.  This will be needlefelted next day.

Monday 15th June

Today the table was set up at its lowest height so it was good for sitting at.  The task for this day was needlefelting - in particular, adding the text to the central part of our wallhanging.  We had a good turnout and it was quite tight fitting everyone in around the table.
I had cut stencils for all the words using my laser cutting machine and we moved these around until we were happy with the positions.  We pinned narrow ribbons across the felt to give a base line for the text - measuring the space between each line to make sure everything was evenly spread and that the text would be straight.  Then we pinned through the stencils to keep them in position while we needlefelted.
We had a bit of debate about which colour of wool to use for our words which ended in a vote in favour of dark green.  All those at the top end of the table started work on the words.
Those at the bottom end added black centres to the poppies and then started work on the knotwork borders.  When school was out, one of the volunteers from the morning session dropped by with her daughters and they had a little go at needlefelting.
Over the course of the day it all took shape and by 3.30 we had all our wording complete and had made a good start on the other details.


Wednesday 17th June

Today was to be another full day of needlefelting. 
This time we moved the table into the art room (it had been out in the wide corridor) because it had been a bit tight to have everyone moving past each other.  Again we had a good turnout - this time with visitors dropping in to see how it was progressing.


Once again, Tracy brought her daughters in after school and this time they added some tiny poppies in amongst the knotwork.  The part that was causing some anxiety was the black cattle - partly because working on that blocked others from working on the border knotwork panels but mainly because people were reluctant to tackle it.  However, Helen (who had drawn the pattern for the cows a few days earlier) volunteered to stay on after everyone else had gone home for the day and she got a lot of fine detail added in.


Thursday 18th June

The final push-------------- the last details were needlefelted in the morning and then we turned the felt over to needle from the back making it more secure.

By lunchtime we were all done and we could move the table back out into the corridor once again raising the legs to standing height.
We poured warm soapy water all over the felt and covered with bubblewrap, then rubbed, and rubbed, and rubbed some more.  Unlike our previous wet felting sessions where we just needed to lightly felt, this time we wanted to get the whole piece fully felted, securing all the needlefetled detail and firming up the felt.   We started off with rubbing on the back, with the last few minutes done without the bubblewrap.  Then the felt/bubblewrap sandwich was turned over and the process repeated from the front. 

The rubbing probably lasted about an hour until I was satisfied that we had a good, strong piece of felt.  Then we rolled it up and squeezed out as much water as we could.


The next stage was the milling.  This involved spreading the felt out on top of bamboo blinds and rolling it up like a swiss roll before taking turns to roll the felt back and forth.
Our numbers had reduced down to just six people (someone must have let on that there was to be hard work in the afternoon!) but we worked in teams and got the rolling done first from one end then the other, then one long side and the other.  This process shrunk the felt further firming it up in the process.
All that remained was to hang it up so we could admire our handiwork and get our final group photograph.

Finishing off.................... the felt had to be rinsed to remove all the soap and give a final shrink.  Because of the size this had to be done in a bath so I took it home and gave it several rinses in hot water - about 4 bathfuls - treading up and down to get rid of the soap.
Damp weather meant it took a couple of days to drip dry.  It is now just waiting for me to give it a good press and to stitch a velcro strip onto the back for mounting.

This is the last of the five wallhangings that have made up this project.  It has been a thoroughly enjhoyable experience working with all these groups and I would like to thank everyone who helped to make the project such a success.   The 5 wallhangings will be displayed in various venues around the Highlands over the next few months and then we hope to have them on display at Celtic Connections in Glasgow in January 2016.

Thankyou to all who have helped, thanks also to Groam House Museum for giving me the opportunity to work on this and to their projects officer, Wendy Sanders for all her hard work organising venues, groups and individuals - without her, it couldn't have happened.

Well done everyone.
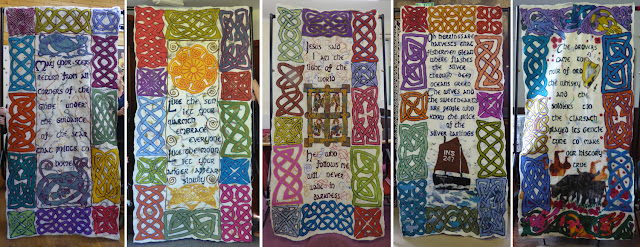
All five banners - left to right, Groam House Volunteers, Resolis Friendship Group, Culbokie Friendship Group, Avoch Friendship Club, Muir of Ord Art Group.


Sunday 31 May 2015

The Fourth Felt Banner - Avoch Friendship Club

This is the story of how members of the Avoch Friendship Club made a felt banner in the parish church hall.  The banner is fourth in a series of five banners being made to celebrate the work of George Bain under the auspices of Groam House Museum.   To read about the first three banners click on the titles for the links.
Banner 1 - made by Groam House Museum Volunteers Group
Banner 2 - made by Resolis Friendship Club
Banner 3 - made by Culbokie Friendship Group


Day 1 - 11th May 2015

A few minutes was spent explaining to the group about the design. Unfortunately I had forgotten to take the full-size paper design out of my car before my husband went off to Stirling for the weekend, but we did have the benefit of the Culbokie panel to guide us.
The first step was to choose the colours to use for the knotwork sections around the edges.


Each person chose two colours that provied a good contrast and started by laying down the darker of the two in small tufts.
Next they laid the brighter/lighter shade on top with the fibres running at right angles to the bottom layer.
Then it was pour water on top, lay on a sheet of bubblewrap and start rubbing.
The purpose here was to make pieces of half-felt - enough rubbing to hold the fibres together to make pieces that could be cut out, but still soft and pliable enough to allow them to felt onto the background at our next session.
As we worked we discussed the design theme for the centre of the panel.  Avoch was at one time an important fishing village and there are still many people involved with fishing boats who live in the village.  We decided that there should be a traditional sailed boat known as a Zulu boat, and that the text should be part of the poem "The Silver Darlings". 
The designs were traced onto special thin fabric that could be put against the wet felt so we could cut out the intricate shapes.  By the end of the day we had the necessary numbers of pieces, all cut out and ready to go.

As well as pieces of felt for the knotwork panels, we also made a large piece for the boat and another couple of pieces from which fish shapes would be cut.

Day 2 - 13th May 2015

We started by laying out the plan on the floor and putting our knotwork panels around the edge so we could all think about the design while we prepared the background.

As with the other banners in the series, we were working on a table 4 foot by 8 foot.  This was covered first with a sheet of bubblewrap, then a layer of icewool fabric.

We started laying down the white merino wool fibres - working from the middle towards the edges.  Then another layer was laid on top, but this time with the fibres running perpendicular to those of the bottom layer.
While most of us worked on this, Jackie sat and threaded tiny gold sequins onto some very fine merino yarn - more will be revealed later!


Once all the white wool was in place we chose some decorative fibres and added them to the surface to provide texture.  We were quite disciplined with this - the top half had additions in shades of pale blue and pale grey (sky colours) which the bottom half got some greens and deeper blues (sea colours).

We laid a sheet of organza on top to keep things in place while we poured on a lot of warm soapy water, then a sheet of bubblewrap so we could spread the water through all the fibres and get everything really wet - towels on the floor to catch the drips!  After a few minutes of rubbing we removed the organza and took a well-earned rest.
After lunch we studied our plan and re-arranged all the knotwork panels until we were happy with the design before transferring each piece to the main felt.
Then our Zulu boat and lots of fish were added to the lower part of the panel, with some fish swimming in and out of the knotwork.  Jackies threads of sequins were added in, some looking like drift nets trailing down from the boat, others streaked through the knotwork so that the sequins looked like lots of shiny bubbles.


We added a bit more soapy water and then started the serious rubbing ...... and rubbing ...... and
rubbing!   Then turned the whole piece over and rubbed some more ........... and more............

Days 3 & 4 - 18th & 20th May 2015

These two days were spent needlefelting.  This is a process sometimes referred to as dry felting and involves stabbing through the felt with barbed needles.
The table was set up at sitting height and covered with slabs of expanded polystyrene.
We started by working out where all the lettering would go and pinning guideline ribbons for the baseline of each line of text.
For our text we had chosen to use the first two and last two lines of a poem called "The Silver Darlings", a name given to the shoals of herring which provided the livelihoods for so many fishing villages in the 19th century, but which also led to many deaths at sea.
Oh herrings are harvests that fishermen glean
where flashes the silver through deep oceans green......
.......The wives and the sweethearts are people who know
the price of the silver darlings.
Once all the text stencils were in place it was a question of needling our navy blue wool fibres through the stencils to build up the letters.

Others worked at the lower end of the felt adding detail to the fish, the boat and the knotwork.
When the lettering was complete we were able to work on adding the detail to create the over & under effect that is typical of Celtic knotwork.


Day 5 - 26th May 2015

We spent the morning of our last day finishing off the detail with more needlefelting.  Some of the lettering was a bit thinner than other parts so we thickened parts up to make it look a bit more even.
Throughout the day we had people dropping in to watch the work in progress - word had spread through the village and people were keen to see what was going on.   Some found themselves sitting down for a few minutes with a felting needle in hand!


Those who came in the afternoon had to done a plastic apron and join in the rubbing!  As on day two, we had the felt flooded with warm soapy water and sandwiched between two layers of bubblewrap while we rubbed .......... and rubbed.......


It was important to get everything fully felted as we hope these felt banners will be around for many years to come, so we all worked hard to work up a lather.  This ensures that the wool fibres all tangle up on each other - the essential process in feltmaking.


The final process is milling.  We first rolled up the felt squeezing out as much of the soapy water as we could - a lot landing on the floor in the process!  We then spread towels over the table and laid out some large bamboo mats.  The felt was laid on top of this and the whole thing rolled up like a swiss roll.  We worked in teams, rolling first from one end, then the other.  Then we re-arranged the mats and rolled from side to side.


The final stage was to to pin a fabric tube onto the back of the top edge of the felt so we could hang it up and stand back to admire our handiwork and have a group photo.


All that remained was for me to take the banner
home and rinse out the soap - a process which needs a bath rather than a sink due to the size of the felt, and treading it with my feet to work out the soap.  Four rinses later the water was running clear so I squeezed out what water I could and hung it out to drip dry in the garden.

There are far more photographs than there is space for on this blog but you can click here to watch the slide show or download individual photographs.